Wednesday, 30 May 2018

May Inspiration continues with 2Crafty Chipboard

Mixed Media Layout - "Escape"


Hi there..
Back today with my second inspiration for May on 2Crafty Chipboard.
A mixed media layout that I created using some of my favourite chipboard pieces and more from Prima/Finnabair.


Historical buildings and ruins fascinate me a lot and so for this layout I used an old 
picture of a castle. For this layout I have used various Mixed Media supplies and
 different techniques on the 2Crafty chipboards.
I started with applying clear gesso on the base. Then I added texture with white crackle paste and stencil, followed by Finnabair Metallic Acrylic paint with a sponge.


I also added some background stamping.
Then I worked on my chipboard pieces. 
For the Ivy cluster, I used two shades of Embossing Powders - green and golden. 
I embossed them with green first and then the gold. 
For the Clock faces, Decorative rods and word title, I applied white gesso and then 
distressed the pieces with vintage brown ink. As a finishing touch I added som
gilding flakes on these pieces for a more rustic look. 


For the flowers, I used the same metallic paint as the base. 
After putting all the elements together, I moved on to embellish it a bit more with art pebbles. I applied a layer of Finnabair wax for the color to reflect. 
Then I added art stones and micro beads. Finally some white splatters.


2Crafty Chipboard used..
Ivy Cluster
6" Clock Face Frames
Decorative rod set 1
Mini word set 1


Other supplies used:

Clear Gesso by Finnabair/prima
White crackle paste Finnabair/prima
Heavy White Gesso Finnabair/prima
Metallique Acrylic Paint "Plum Preserves"
Lindy's EP "Spanish moss green"
Ranger EP "Gold"
Kaisercraft clear stamp "Lattice"
Ranger Black archival ink
Flowers from wild orchid crafts
Cosmic Shimmer Gilding Flakes
Distress ink "Vintage Photo"
Art Stones by Finnabair/prima
Micro Beads "Copper"
Art Pebbles by Finnabair/prima
Wax "Vintage Gold" by Finnabair/prima


Hope you enjoyed the post and got inspired :)

Hugs!


Friday, 11 May 2018

May Inspiration for 2Crafty Chipboard

Steampunk Canvas - "Hold On To Your Dreams"
For 2Crafty Chipboard


Hello there..
I am here today with May Inspiration for 2Crafty Chipboard. I created a Mixed Media Steampunk Canvas using my favourite chipboard pieces from 2Crafty and Products from Finnabair/Prima Marketing.


For this canvas, I created lot of background texture and covered it all with black gesso. I primarily used Rust Effect Pastes from Finnabair on all of this canvas including the chippies.
I have prepared a step by step video tutorial (link below).
Some detailed pictures..


Enjoy the Video Tutorial..


2Crafty Chippies Used:
Giant Gears
Medium Gears
Guitar Collage


Other Supplies used:

Blank Canvas
Dina Wakley Media Black Gesso
Crackle Texture Paste by Finnabair/Prima
Modelling Paste Opaque Matte by Finnabair/Prima
Tim Holtz Stencil "Harlequin"
TCW Stencil "Art Is"
Rust Effect Pastes by Finnabair/Prima
Waxes in "Rich Copper" and "Vintage Gold" by Finnabair/Prima
Metallique Acrylic Paints in "Rich Turquoise" and "Bronze"
Metal Embellishments
Glass glitter "Bronze" by Finnabair/Prima
Micro Beads "Copper" by Finnabair/Prima

Hope you enjoyed the post and got inspired :)

Hugs!!


Friday, 4 May 2018

May Inspiration for Mixed Media Warriors


Hi there..

Back today with my project for May Challenge on Mixed Media Warriors. Sadly this is my last work with MMW as my term ends here. 
I altered a wooden box using some elements and the amazing Finnabair's products.


There's also a DT call, please check the details.


So for this box, I started with adhering some random wooden pieces on top of the box, followed by a piece of chipboard that has squares pattern. I then applied sand texture paste generously all over the box and sprinkled some mini art stones on top for added texture. Then I covered the whole box with black gesso.


Next step is putting up the elements. I have used a mixed of junk and some of Prima/Finnabair.
I adhered them all in my chosen pattern with 3d gloss gel. Once the elements have dried, I covered them all with black gesso, except the typo bulb.
After drying the gesso layer, I moved on with color. I used two colors from Finnabair's Metallique Acrylic Range and two different shades of waxes for the highlights.
First I dry brushed the whole box with Metallique Acrylic "Plum Preserves" which is a gorgeous deep purple color with maroonish undertones. Next I added some dry stokes of "Rich Turquoise" sparingly on the elements and in the surrounding area.
Finally I added the highlights of waxes in "Vintage Gold" and "Royal Robes". 
For the typo bulb, I added the "Vintage Gold" wax at the back, for the color to reflect.


And that's all about the process of creating this box. 
It was a fun project and I really had a wonderful time working on it.

Supplies used:

Wooden Box
Dina Wakley Media Black Gesso
White Sand Texture Paste by Finnabair/Prima
Chipboard piece by 2Crafty Chipboard
Mini Art Stones by Finnabair/Prima
Prima Junkyard Findings Typo Bulbs
Finnabair/Prima Art pebbles
Other metal embellishments by Finnabair/Prima
3d Gloss gel by Finnabair/Prima

Hope you enjoyed the post and got inspired :)

Hugs!


Monday, 30 April 2018

April Inspiration continues at 2Crafty Chipboard


Hey there..
I am back today with my second inspiration project for April on 2Crafty Chipboard Blog.

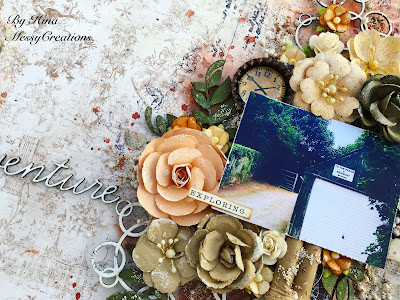
Mixed Media Scrapbook Layout - "Adventure"


I love nature and love to create nature and travel based themes.
 The picture in this layout was clicked on my visit to Wales last summer. 


For this Layout I used bubble clumps and some foliage chippies, along with the title. The paper I used from Maja Design and did my background with a coat of white gesso over the design area using an unused smart card, followed by a stencil pattern with sand texture paste. Then I used spray from Lindy's Gang to add color and finally background stamping and some splatters.
Next I prepared my chippies. I embossed the bubble clumps and the title "Adventure" with embossing powder from Lindy's and then slightly distressed the edges that I always love to do. I feel scrapbooking is not complete without some amount of distressing.


For the Foliage chippies, first I applied a layer of white gesso with a sponge and then I used Finnabair's metallic acrylic paint "Golden Moss", just roughly applied with my finger.
I did not cover the leaves generously with paint. Finally, I distressed the leaves to make
 them look rustic.


After I was done working on my chippies, I moved on with the layering of collage elements starting with some scrap pieces of papers along with the bubble chippies, flowers, foliage chippies and metal embellishment. To be honest, I find the layering and composing takes most of the time while designing a scrapbook layout. Once I was happy with the composition, I moved on with my favourite part of adding Art stones and micro beads as a final touch.


To finish off, I added highlights of white gesso and some more stamping where needed.


2Crafty Supplies used:

Bubble Clumps
Foliage Set 1
Mini Travel Word Set 2


Other Supplies used:

Flowers by Prima Marketing
Lindy's starbust spray "Milk Chocolate Brown"
Lindy's EP "Purely White"
Metallique Acrylic Paint by Finnabair/Prima "Golden Moss"
White sand texture paste by Finnabair/Prima
White Gesso by Finnabair/Prima
Kaisercraft clear stamp "Botanical"
Art Stones by Finnabair/Prima
Stencil by Finnabair "Honeycomb"
Bronze Micro beads by Finnabair/Prima
Distress ink pad "vintage photo"
3d gloss gel by Finnabair/Prima


That's all for today friends..
Hope you enjoyed the post and got inspired :)

Hugs!

Sunday, 29 April 2018

April Inspiration for 2Crafty Chipboard


Hello Friends..

So I am back this month on 2Crafty Chipboard Blog to inspire you all. So here's my first project...

Mixed Media Canvas  - "Precious"


I created this canvas using some really gorgeous pieces of chipboards from 2Crafty, especially the tattoo design that I really liked.
I layered my other elements with the chippies, overlapping where needed.
To start, I covered my canvas with a patterned paper from my stash and prepared a background with some stenciling and stamping. Then I moved on with arranging the collage elements, starting with some scrap pieces of paper and lace. 


With my layers, I incorporated the chippies. For the tattoo swirl, lacey border and loopy font "Precious", I applied the same technique. I applied Finnabair's metallic acrylic paint "Romance Pink" roughly with my finger.


 After that I did some random stamping on the chippies with black archival ink, followed by distressing the edges. I love adding some details to chippies. I also applied some highlights of Finnabair's wax "white gold" which actually added more interest. 
I used a set or gorgeous flowers from Prima Marketing that came up very well with theme. I made this clock using Prima IOD mould and paper clay and applied a layer of Finnabair wax to give it some shine and color. 


For the butterflies chippies, I used Lindy's spray in denim blue color after a layer of white gesso and then highlighted them with wax.
I used some Art Pebbles and lots Art stones and glass glitter from Finnabair/Prima to add to the surrounding embellishments.
Finally added highlights of white gesso and distressed the edges of my canvas.

I loved the outcome of the chippies and they really added to the overall feminine look of the canvas.


2Crafty Chipboards used:

Tattoo Swirl 1
Lacey Border Set 1


Loopy Font "Precious"
Sharon's Butterflies


Other supplies used:

Prima Flowers
Metallique Acrylic Paint "Romance Pink" by Finnabair/Prima
Prima IOD Mould
Prima Paper clay
Stencil by Tim Holtz "Harlequin"
Modelling Paste by Finnabair/Prima
Texture clear stamp by Kaisercraft "Diamonds"
Art pebbles by Finnabair/Prima
Art stones by Finnabair/Prima
Glass glitter "Gold Rush" by Finnabair/Prima
3d gloss gel by Finnabair/Prima
Distress ink pad "Vintage Photo"

That's all for today friends..
Hope you enjoyed the post and got inspired :)

Hugs!


Sunday, 15 April 2018

April Inspiration for Words & Paintery

Mixed Media Layout - "Nature's Wonder"


Hello Friends....

I am here today with my inspiration project for Words & Paintery April Color Palette. Lovely soft shades, really fun to play with. I created a Mixed Media Scrapbook Layout.


I created my background with a stencil pattern using Lindy's spray and distress ink, followed by background stamps which is my favourite always. 
I chose this picture for my Layout as I am entering this project to Scrapki-wyzwaniowo April Challenge - Gardening. It's spring after all :)
I love using flowers in my layouts with some detailing around. Here I have used flowers from Prima Marketing and lots of Art Stones and micro beads by Finnabair/Prima. I embossed some die cut leaves in a lovely shade of green from Lindy's and also slightly distressed the edges. To add to my details, I have used my favourite chipboard pieces from 2Crafty Chipboard. I have distressed the chippies to highlight them more.
Some detailed pictures..


Supplies used:

Heavy White Gesso by Finnabair/Prima
Paper from Pion Design
Chipboard pieces from 2Crafty - Moroccan Bits
Flowers from Prima Marketing
Lindy's Starbust Spray - Edelweiss Moss Green
Lind's EP - Spanish Moss Green
Tim Holtz distress inks - Crushed Olive & Vintage Photo
Background stamp by Finnabair/Prima - Messy script
Background stamp by Kaisercraft - Lattice
Art Stones by Finnabair/Prima
Bronze Micro Beads by Finnabair/Prima

With this Layout I participate in:


Hope you enjoyed the post and got inspired :)

Hugs!!


Saturday, 7 April 2018

"To Dreamland" - Mixed Media


Hi there..

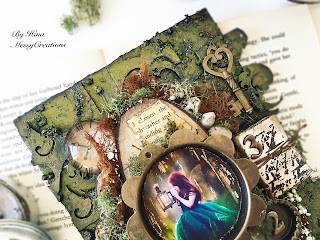
Today I am here with something mystic to share. A Mixed Media project that I created inspired by the Mixed Media & Art March Challenge Moddboard which has a mystic theme. 


I was really inspired by this mystical theme and had lots of greens and browns in my mind for this project. I love nature and it always fascinates me, especially the woods. I love fairy tales too and magical, mystical elements are always very appealing to me.
I started with a small canvas board and in the background I applied a thick layer of Plaster Paste by Finnabair, After that I adhered some random chipboard negatives for an enhanced texture. On top of it I applied some texture paste crackle by Finnabair and lots of Art stones as I wanted it more grainy. 


Then I covered everything with black gesso and moved ahead with dry brushing Finnabair's "Golden Moss" metallic paint. I also sprayed some distress spray stain in "walnut stain" for some brown highlights. Then I started with my collage elements. I had a wood panel that I chose as a focal point and used lots of cheese cloth and sisal beneath it. Arranging all other elements around it. I was fascinated by the Trilogy in the moodboard so created a small book with number 3 on it. I wanted to put a magical picture in the center and for that I chose Finnabair metal embellishment to accommodate the picture. I used 3d gel by Finnabair to adhere the elements.
Once I was done with the elements, I added some more color until I was satisfied and added lots of art stones here and there. I also added some small pebbles.
I distressed the edges of my canvas and applied some highlights of Finnabair's wax in "Bronze Age".
That's all.
Some more detailed pictures..


Supplies used in the project:
Plaster paste by Finnbair/Prima
Texture crackle paste by Finnabair/Prima
Art Stones by Finnabair/Prima
Dina Wakley Media Black Gesso
Finnabair Vintage Mechanicals
Tim Holts idea-Ology clipping stickers
Prima Resin butterfly
Art pebbles by Finnabair/Prima
3d Gloss Gel by Finnabair/Prima

With this project I participate to:


 Hope you enjoyed the post and got inspired :)

Hugs!